Here is another video tutorial only. There is no tutorial with written instructions included, although the directions in the video are very good and easy to follow.
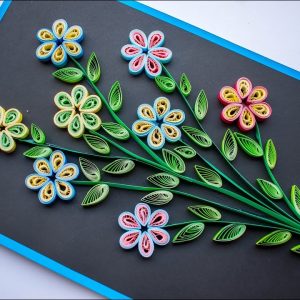
What better way to say “Happy Mother’s Day” than with a beautiful handmade card made by you using paper quilling?
Sure, your mother and father truly loved all of the handmade gifts and cards you created as a little tot, but this card will truly be a treasured gift all in itself, even though you have grown up!
Here is the video!
Click Here if the above video doesn’t play on your device. You will be redirected, in a new tab, to watch the video at YouTube.
The process of rolling, scrolling, and shaping paper strips into pleasing designs is called paper quilling. Paper quilling is also called paper filigree.
In fact, quilling is not a new craft; it was invented in the 15th century, though it remains popular today even with all of the technical advances made since then.
This is a remarkably easy hobby to learn, does not involve a lot of money, and produces beautiful works of art within a short period of time.
The fact that it is still popular after centuries of being around is no surprise!
How To Make Quilled Flowers
Among the most popular patterns of quilling are flowers, and this tutorial demonstrates how to make a simple flower out of strips of paper.
You will soon be on your way to creating some of the most beautiful paper filigree projects. Once you discover how to make that flower from two paper shapes, it will be very easy for you to do the same thing with other different shapes of papers.
As a complete beginner, you will most likely have the basic supplies you need to get started readily available at your home. There is no doubt that it is easier if you purchase some basic quilling tools, such as the pre-cut strips of paper, so that your flowers come out neatly curled. However, if you prefer, you may always choose to cut your paper strips by hand.
What You’ll Need
Equipment / Tools
- Quilling board
- Slotted quilling tool
- Needle quilling tool
- Toothpicks
- Scissors
- Paper trimmer/cutter (if cutting paper strips by hand)
- Craft glue
- Straight pins (optional)
- Hot glue (optional)
- Tweezers (optional)
- Ruler (optional)
Materials
- Paper for strips or pre-cut paper quilling strips approximately
- Small flower pot (optional)
- Floral foam (optional)
- Thin wood dowels or wood skewers (optional)
- Artificial Spanish moss (optional)
Build the Flower Petals by using the following instructions.
In order to make the flower petals, you will need to cut six white strips of paper.
- Strips should be cut 12 inches long by 3/8 inch wide. In the case of using either pre-cut or pre-stretched strips of quilling paper, you may find you have to cut them down a little bit in order to perfect your design.
- It is necessary to first take a piece of paper and place it in the slot of a slotted quilling tool in order to make a paper petal.
- As you slowly turn your tool around, make sure that all the paper winds evenly around the tip. Hold the tool between your thumb and index finger and turn the tool as required.
- The coil must be removed from the tool, then placed in a circle on the quilling board. Let the coil unwind until the coil is the same diameter as the ring.
- The paper coil is removed, then glued to the strip end, leaving it to dry. It is possible to then manipulate the paper to be shaped differently.
Using a Template Board

Here is a picture of what a quilling board looks like.
Most quilling boards have measurements either in inches or millimeters on them.
A paper coil is formed into a tear drop shape by squeezing it.
- The best way to make a teardrop shape from a paper coil is to first pull the ends of the coil downwards and hold while pinching the end with one finger and holding while pulling the side with the point upwards. The paper circle will now take the shape of a teardrop.
- To make the paper petals of your quilled flower, make six teardrop shapes of paper.
To make the center of the flower, do the following steps.
- You will need two colored paper strips (each measuring about 3/8 inch wide and 12 inches long) and the slotted tool to make the center of the flower.
- The paper strip should be threaded through the slot and the tool should be turned so that adequate tension is maintained.
- Once the coil is formed, you must apply some glue on the end of the paper strip and allow it to dry. Keep the coil in the tool and do not remove it.
- A bit of glue should be applied to the rolled coil and another paper strip should then be placed over the top of the first paper strip.
- Roll the second piece of paper into the coil, making sure to maintain tension.
- A bit of glue should be added to the end of the second paper strip.
- Make sure the glue dries completely.
- The tight coil must be removed from the slotted tool.
Glue Together Your Quilled Shapes
- Place the six teardrop petals along the paper coil so that they form a flower shape.
- Make sure that the teardrops are adhered to the paper coil as well as the sides of each teardrop shape.
- The glue should be allowed to fully dry.
- You will be able to move the flower after it dries, and it should hold its shape if you pick it up.
Many tips can be found on the web on how to most effectively handle delicate quilled parts. Here are a couple of tips you can use when gluing them together.
- When the small quills are glued together, tweezers make it easier to place them in place and arrange them properly.
- When the glue dries, using straight pins can support the quilled rolls until they are glued in place and the glue is dry.
You can make a lot of beautiful things out of quilled flowers, including cards, scrapbooks, wall hangings, and even as welcoming signs of spring in your home.